Friday, December 21, 2012

The Power of Their Ideas

When I was growing up, if you wanted to make some money you were pretty-much limited to a fast food chain or lemonade stand, but that was before the internet when we were all still living in caves and using pay phones. But with the advent of the internet, a whole world of opportunities has opened up to our children. From Blogger, to Ebay, to Etsy, our kids have so many opportunities to showcase their creativity and even make a little money.

Earlier this year, my 7-year-old wanted to create his own blog (I wonder where he got that idea from?) and Sebastian's Game Blog was born. He hasn't done a ton with it, but the fact that he can is so incredibly cool to me.

Recently, I discovered that my niece, Sarah, was starting her own online business This isn't just a little fun blog or kiddy art site - oh, no - this is an Etsy store, Sunshine Vinyl, where you can purchase personalized monogram stickers for cars, laptops and pretty-much anything else you could possibly think of. She came up with the idea, bought the machinery, opened the store site, made examples, took pictures, wrote descriptions and priced the items herself.

Oh... did I mention that she's seventeen.

When I was seventeen, I worked at Taco Bell.

Over my many, many years, I've spent considerable time worrying about what I could do to bring in money for my family, and have felt, like so many of you, like an incompetent moron as I watch these young whipper-snappers dance figurative rings around me.

But now I realize that my problem is not a lack inspiration, or drive, or even computer know-how, it's me. It's the mentality of a thirty-something year old that a business is made up of four walls and a cash register. It's the fear of investing in something only to have it fail. And it's the worry that my ideas aren't good enough. What these kids understand is that life about taking chances? If you don't take chances, you'll never achieve anything. You have to have faith in the power of your ideas and go for it!

This lesson I have learned from a seventeen-year-old entrepreneur who is not only bright and creative, but brave enough to take those chances. I applaud her and wish her the best.

And, in the future, when this old lady needs business advice, it's nice to know I have a teenager waiting in the wings to guide me.

Damn, I'm old! :)

Check out Sarah's Etsy store: Sunshine Vinyl

Sunday, December 16, 2012

LInk to: Thinking the Unthinkable

In light of the recent events at Sandy Ridge Elementary, I wanted to share with you an article that has touched me deeply. It is written by a mother who is struggling to raise a child with mental illness. It has opened my eyes to the limits of our mental heath system. I hope you will find it as touching and poignant as I have.

Thinking the Unthinkable
By The Anarchist Soccer Mom


Sunday, October 14, 2012

Moment of Change


In everyone’s life there are moments of change. Where, in a blink, your life takes a drastic turn. I’m not talking about your fist kiss or high school diploma. These are moments that resonate so deeply within your psyche that the entire trajectory of your life is forever altered. For many of us, having our first child is one such event - when the world suddenly doesn’t revolve around us anymore, and we understand what real love is.  Six years as a mother and wife, and my trajectory seemed locked firmly into place, until one moment forced it off its mark… the day my father told me he had cancer.
I knew he was going in to have a biopsy of a mass in his leg, but we all thought it was nothing – just a complication from a recent knee surgery. It wasn’t. My father had a massive Soft Tissue Sarcoma, or cancerous tumor, in his calf. I was terrified. The doctors checked his lungs, supposedly the next stop for this type of cancer, and they were clean.  He went through radiation therapy and they successfully removed the tumor. We thought we’d dodged a bullet. But six months later, on a routine scan, our carefully constructed fantasy fell apart. The cancer had metastasized to his lungs. 
The reality that my father might die hit me like a sledgehammer. The fear was suffocating.  What’s worse, I was completely helpless. All I could do was watch as this man who was, and always will be, my hero tremble in fear as he was taken away for surgery, then stand-by impotently when he woke up in so much pain he could barely speak, and have little beyond encouragement to offer as he suffered over weeks of recovery. Praying served no comfort. I’m agnostic so I wouldn’t know who to pray to anyway. So I just watched as my father slowly recovered and I continue to watch even now as they scan his lungs every three months for more tumors, and worry if this time will be the last.  Life goes on day by day, but this worry I carry with me, though at times it only exists as a kernel of doubt in the back of my mind, it is always there haunting me.
Recently, I discovered that an acquaintance of mine had lung surgery. My mind went immediately to my father. I knew with complete certainty what he was going through, and though I was concerned, it wasn’t until my friend was recovered and we were face to face, that I mustered the courage to ask how he was doing. I didn’t know he had cancer. I wondered, but I didn’t know, and wouldn’t have asked if he hadn’t told me. Here was a young man, about my age, who had the exact same metastasized sarcoma as my father, except for one difference… he was sicker. I could feel a slew of emotions all striking me at once, but all I could summon to say was, “I’m sorry.” Then he surprised me. Without a trace of sadness or fear he told me that he wouldn’t “give up the experience.” Of course, he wished he didn’t have to be sick, but he wouldn’t want to give up the experience because he’d learned so much. “You see things differently,” he said and I understood what he meant. You do see things differently. When something so significant touches your life, you cannot pass through it unchanged. For each of us the effect will be different: some look for answers in religion, others achieve a renewed focus on family, and still others become angry and bitter. I can’t say exactly what my friend or even my father took from this experience, but even so I understood, because fundamental to it is a re-evaluation of your life.
That is why, at 36, I threw away my career as a teacher to pursue writing. It’s why I’m pouring my heart out onto this paper with little regard for the risk involved in sharing something so personal with total strangers. My whole life has been an exercise in playing it safe - doing things the “right” way - but life’s to damn short to waste away on being safe. I refuse to continue focusing on a future that may never come. I don’t know about heaven or hell or the nothingness that may be waiting for me on the other side. All I truly know is the here and now: my home, my friends and my family.  And for all the pain and uncertainty that surrounds me, I refuse to wallow in the things I cannot change, but focus on the here and now.  I may not be able to live forever, but what I can do is live and live well. 

Wednesday, September 12, 2012

Deceptive Marketing - No Sugar Added


It really gets me upset the way corporations purposely mislead the public to sell their products.  I discussed one example a while back in my post about Disney Princesses and Marvel Superhero children's multivitamins. The was a specific example, but with this article I wanted to discuss a form of misleading marketing that is more wide-spread: The use of "No Sugar Added." or "Sugar Free" on product labels. With so much of the public trying to maintain healthy lifestyles, companies have tried to alter or re-market their products as healthy while giving people the flavor (i.e. sweetness) they secretly crave. It's all about sales, baby. And while supply meeting demand is a good thing in theory, when you add unscrupulousness corporations into the mix, you end up with deceptively marketed products. That is why so many products you find labeled as "no sugar added" contains one of the following sugar substitutes: 

  • Aspartame - Equal or NutraSweet
  • Acesulfame K, also known as acesulfame potassium - Sunett and Sweet One.
  • Sugar alcohols - sorbitol, xylitol or maltitol
  • Saccharin  - Sweet'N Low
  • Sucralose  - Splenda
  • Neotame
(You don't see Stevia in many products right now, but as it gains popularity I'm sure you will).

I am not about to start debating with you about whether these items are good, bad or the devil incarnate. Conspiracy theories abound, and no one really trusts what the FDA says so getting to the truth of the matter is nearly impossible. What I will say is that, as a parent, I try to avoid giving my children unnatural (i.e. chemically produced) products, and it irritates the hell out of me when companies deceptively market products such as these to kids. I cannot tell you how many people I know who have gotten fooled by this marketing, and even though so many of us do know what's happening, no one seems to want to call the corporations out for it. Why? Because of the ingredients list on the back of the package, but most of us don't have the time to check the packaging of everything we eat, and the corporations know it.  That's where I come in. :)

For the sake of journalism, I took a walk around my local grocery store and photographed some examples to illustrate my point. Yes, I looked like a fool and people stared. That's how committed I am, or should be committed... whatever.

So here goes...

Sugar Free Jello Pudding - Contains xylitol,  acesulfame potassium, and sucralose


Del Monte  - Mandarin Oranges (No sugar added) - Contains sorbitol,  acesulfame potassium, and sucralose


Del Monte - No Sugar Added Sliced Pears  - Contains acesulfame potassium, and sucralose


Nesquick -  Chocolate (No sugar added) - Contains acesulfame potassium, and sucralose

 Sugar Free Syrups - Mrs. Butterworths - Contains neotame,  acesulfame potassium, and aspartame


So kids, the moral of our story is... CHECK THE LABELS!

Always, always, always check the labels of the products you buy. It's a pain in the neck, but totally worth it in the long run. I hope some of you have found this helpful. If you know anyone who might benefit from this information, please pass it along.  Thanks!

Tell me what you think or add to the discussion in the comments section below.

Wednesday, September 5, 2012

Easy and Delicious - BBQ Ribs

Anyone who knows me, knows I love to cook. Back in my pre-children days, I would spend hours concocting wonderfully elaborate and delicious meals (and somehow stayed skinny, but that's another post).  As a mother, I have had to whittle my recipes down to their simplest forms so I could manage cooking and childcare at the same time. So I thought I would share a few of my favorites with other busy moms. This first recipe is for barbeque ribs. It is simple to make and delicious!

Just an fyi...
For me, simple doesn't mean fast (though I have a few of those), it means quick and easy preparation without five hundred, freshly purchased, chopped, diced, and petrified- blah, blah - ingredients. I also don't do much in the way of measuring since this is the real world, and in the real world we don't really measure crap. So I will give you a basic idea of how much seasoning to use, but if you want exact measurements, I'm not your girl.

So on to my recipe for Barbeque Ribs.

BBQ Ribs
Ingredients:
  • One full rack St. Louis style pork ribs (you can use baby back, but St. Louis style are cheaper)
  • Apple cider vinegar
  • Brown sugar
  • Oregano
  • Garlic salt (I use Lawry's coarse garlic sat)
  • Paprika
  • Black pepper
  • Cayenne Pepper (optional)
  • BBQ sauce (whatever you like)
  • Large, sturdy pan
  • Aluminum foil
1. So here's the trick to making really good - fall off the bone ribs - without smoking them for 2 days. Boil them. That's right! Take your (completely thawed) ribs, cut them in half if necessary, place them in a large pot and fill it with enough water to completely cover the ribs. Bring the water to a boil and lower temperature slightly to keep it at a rolling boil, for 30 minutes to 1 hour. 30 Minutes is the minimum, but the longer the better. You can add a little salt to the water if you like.

This is what it will look like:

 YUMMY!!

Okay, so this looks gross, but it's normal. What you're seeing is all of the fat and icky stuff (yes- that is a professional term) coming out of the meat and floating to the top of the pot.

2. While you're waiting for the ribs to boil, line a large sturdy pan with aluminum foil. Trust me, you don't want to cook this in an unlined pan. Cleaning an unlined pan after the fact is a nightmare. I line it with several sheets because the ribs tend to tear through the foil.

3. Once the ribs are done boiling, remove them from the pot using tongs. Be careful because they have a tendency to fall apart. Position them on the pan however they fit with the underside facing up. Coat it with garlic salt, then flip the ribs over so the meaty side is facing up. 

4. Placing your thumb (or two fingers if you have small thumbs like me) over the lip of the bottle, lightly sprinkle apple cider vinegar all over the ribs - rub it in with a large spoon.

5. Next take a small handful of brown sugar (about a half cup), sprinkle it all over the ribs, and rub it in with your fingers.

6. Now the seasoning. Generously coat the ribs with the garlic salt and paprika. Lightly sprinkle it with a bit of oregano ( about a half tablespoon dried and crushed), and add just a pinch of black pepper and cayenne pepper. A a pinch will only add to the flavor. My kids don't like too much spice so that's all I use. If you want it spicier, add more pepper, but be careful, a little goes a long way.

This picture is kind of ugly, but it's the best I could do with the crappy lighting in my kitchen.

7. You will want to cover the entire pan with foil. Tent it slightly so the foil isn't rubbing against the ribs like so:

8. Cook ribs at 350 degrees for 25 to 30 minutes.

9. After 30 minutes, remove the foil and spread barbeque sauce all over the ribs with a spoon. (I use a spoon because a brush tends to just pull up the seasoning and doesn't coat as thickly).


10. Place ribs back in the oven - uncovered- and let it cook another 5 to 10 minutes or until the sauce firms up into a glaze.

Remove from the oven, cut, serve and enjoy! :)


Tuesday, August 28, 2012

Homemade Laundry Detergent - Is it worth it?

It seems lately that a lot of moms are switching to making their own homemade laundry soap. I've been getting tired of spending a ton of money on safe, ECO-friendly laundry detergents, so I thought I would give it a try. I started out using the basic recipe I found on most sites.
  • 1 cup borax
  • 1 cup washing soda
  • 1 bar Fels-Naptha laundry soap

So I began by grating the Fels-Naptha. About halfway through I started to wonder about the decision to use this product since the smell was so overpowering. It occurred to me that I hadn't checked the label on the back of the soap. Why? I don't know. I always check labels. I guess my initial feeling was that this was supposed to be natural and safer so I didn't need to worry about it. After checking the label, I realized how misguided this thought was.

This is how it reads: 
Ingredients: Cleaners, soil and stain removers, chelating agents, colorants, perfume

I hate it when companies do this. I think I have a right to know what is in a cleaning product. It doesn't help me feel better when I read the caution right below the ingredients which read:

Caution: Eye and Skin Irritant. Avoid contact with eyes and prolonged contact with skin.

So It was at this point I decided to do some investigating. I found the actual list of ingredients on the Fels-Naptha web site. Here they are: 


Soap (sodium tallowate*, sodium cocoate* (or) sodium palmate kernelate*, and sodium palmate*), water, talc, cocnut acid*, palm acid*, tallow acid*, PEG-6 methyl ether, glycerin, sorbitol, sodium chloride, pentasodium pentetate and/or tetrasodium etidronate, titatium dioxide, fragrance, Acid Orange (CI 20170), Acid yellow 73 (ci43350) 

Since I can't tell you what any of those ingredients are, I had to do some more searching.  What I found was that a number of these ingredients are questionable, and they most definitely are not natural. (Although arsenic is natural so maybe that shouldn't be a litmus test for health) For example: Titatium dioxide is a known contaminate and is harmful to wildlife, Acid yellow 73 is banned for use in cosmetics and show to be potentially unsafe in a number of studies, and PEG-6 methyl ether is a skin irritant and there is a small amount of evidence that it may be linked to organ toxicity.

Overall, it's not so bad, but my feeling is if I'm going to go to all this trouble to make my own laundry soap, then I should feel like it's safe for my family. So I decided to toss the Fels-Naptha and purchased some castile bar soap. I got Dr. Bronner's All in One Hemp Rose Castile Soap. It smells so good! So I grated it up and combined it with the other two ingredients. I used it in my wash a few times but it only worked okay to be honest. A lot of my clothes were coming out stained and I didn't feel like they were getting as clean as I would like. One plus.. my clothes came out much softer.

Not to mention, I was a bit put off by using borax. I have avoided it for a long time because I am concerned about it being slightly toxic. It was one of the main reasons I took so long to make my own laundry soap. I use hydrogen peroxide in my all purpose cleaner instead of borax. I have tried many times over to research borax, but have found much of the information out there to be contradictory so to be on the safe side, I decided to look into ways of making laundry soap without it.

Most of what I found was simply the same recipe as above without the borax. So I thought I would give it a try, but as I was mixing my ingredients, on a whim, I decided to check the directions for using the washer soda. To my surprise, it said to add 1/2 a cup to loads to increase the effectiveness of your detergent. 1/2 a cup! I was using about a tablespoon a load. No wonder it didn't work well. So I adjusted my recipe as follows:
  • 1 bar Castile soap
  • 7 cups washing soda
At about a  half cup a load, that equaled 16 loads. It worked much better, except my clothes weren't as soft so I gave in and added a cup of borax to the mix to make it:
  • 1 bar Castile soap
  • 7 cups washing soda or a whole 55oz box
  • 1 cup borax
That helped, though my clothes still weren't as soft as before. They were definitely coming out much cleaner though. 

So here is my issue.... was it worth it? Did I save any money on this venture or am I better off going back to the ECO detergents?

So I did the math.

My laundry soap cost $3.59 for the soap, $3.29 for the box of washer soda and 4.79 for box of the borax which I used approximately $.50 worth.  If I use the full 1/2 cup per load this comes out to... (drum roll)

Grand total: $7.38 or $.41 a load 

Per load, this is how it compared to the Eco friendly detergents:
  • 7th Generation liquid  $16.00 for 66 loads or $.24 a load
  • 7th Generation powder $15.00 for 70 loads or $.21 a load
  • Method $15.50 for 50 loads or $.31 a load
  • and Meyers $16.00 for 64 loads or $.25 a load

Wow! That's a big difference! Of course, most of us realize the number of loads represented on a box is usually inflated, listing the amounts or a "regular" or medium size load when I'm referring to a large load, but even so it's a big difference. From what I can tell both financially and time-wise, it just doesn't make any sense to make your own soap. Now, if you are dealing with allergies or just want to be absolutely sure of what's in your soap, then this could be a good alternative.

But for me, it just makes better sense to buy.


Next investigation... which laundry detergent works best! :)

Monday, August 20, 2012

Getting Organized - Children's Toys

I think I can! I think I can! I think I can!

So as I might have mentioned once or twice before, I'm a slob. And not a happy one either. I hate my house being such a disorganized mess. It drives me crazy! I said I was going to take this summer to get my act together now that I wasn't working and had more time. Didn't happen. I got sidetracked will a million other things and quit before I even got started. But on my trip a few weeks ago to visit family in Miami, I had an inspiration... my sister in law. She has two kids, two jobs, and the nicest most organized home I've ever seen. No, she did not clean it up for our visit. She actually keeps it that way ALL OF THE TIME!

She admitted to me that she was a bit OCD, but unfortunately for me, that is one disease that isn't contagious so almost immediately after our arrival back in town, my house returned to its usual trashed-like state. I wanted to pull my hair out! Luckily, I had the image of my sweet sister in my mind reminding me that it is possible. My house can be clean. So now, I am a woman on a mission, and unlike my mission to lose weight this is a real mission that I will complete or die trying. (Okay. Maybe that was a bit overdramatic). I will organize my house! Who's with me?

First off, the one part of the house, I started, but never got around to finishing... the playroom.

This playroom actually started out as a home preschool that I ran for a couple years. I closed it this spring, and turned it into my kids playroom. I have a few things in here that I think were pretty cool ideas that I'd like to share.


First off, is the reading area. As you might have noticed, this "couch" is actually a toddler bed, purchased at a garage sale. I got the mattress on craigslist. I'm not typically a fan of used mattresses, but they aren't sleeping on it so I'm not so worried. It's really nice because I can cover it with a mattress pad and sheet, and wash them easily when they get dirty. Underneath the couch are book bins - labeled with pictures so my daughter knows where the books go. I'd prefer a bookcase, but simply didn't have the space for it.

Next you'll see my block area. It's actually a really old entertainment center, but works great for the blocks. Old entertainment centers are wonderful for storing kids toys. They are sturdy and have deep shelves which are usually a good fit for plastic bins. They are also low to the ground and don't pose a tipping hazard. Best of all, since no one uses big heavy TV's anymore, you can often find these for really cheap at garage sales or goodwill.


Beside the blocks is our easel. I purchased it for $35.00 at A.C. Moore with a half off coupon. Moving on...


On the opposite end of the room I have a ridiculous amount of dress up clothes (remember, I ran a preschool).  To avoid having to drill hooks into the wall, I just used Command wall hangers to hang the clothes on and a crate to hold the larger items in. I also have a three drawer bin, to hold all of the little things like tiaras and dress-up shoes.


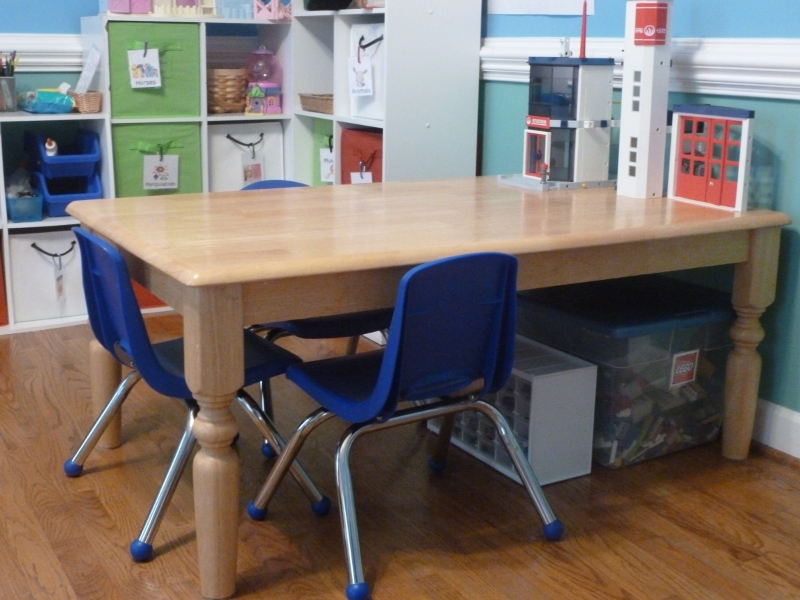
Our art table was, if I do say so myself, as stroke or genius or maybe just common sense. Either way, it's awesome! All I did was take a wooden kitchen table I purchased on Craigslist and have the legs cut down at Home Depot (for free :) ).


Above the table, I placed thin rectangles of cork board along the wall to hang the children's art from.

Last but not least, is my wall of cubbies. I already had the wooden cases from my school, as well as a few of the boxes. Then I spent the next couple of weeks hoarding A.C. Moore coupons (see a trend here) and purchasing them one at a time to save money. I even went so far as to have my 6 year old buy a few with coupons so I wouldn't have to make multiple trips. (Hey, it says one coupon per customer. There were no stipulations about the customer's age). The challenge with these cubbies is that they are, obviously, not transparent so the kids can't see what's in them, and labels don't stick well to the canvas coverings. My solution was to make labels and hang them from the box handles with tiny climbing hooks. I got them two for a dollar at Walmart.

How do I make labels? Well, I'm so glad you asked. This is what I do:

I make them in word.

First I choose a simple font, like Veranda or Times, and make a list of all the descriptions I want to use to label my bins. These are going to be different for everyone depending on your child's interests, but just to give you an idea of what I'm talking about, here are the ones I made: Art, Coloring books, Play dough, Horses, Action Figures, Barbies, Cars, Stamps, Dress-up, Instruments, Books, Legos, Animals and Dolls. Next, I googled images to match my descriptions, and saved the pictures I liked into their own file. (You can just use clip art, but I've found much nicer images through Google). Then, I divided my document into two columns (to save paper) and inserted the pictures beneath the descriptions.  I then printed, cut and laminated all of my labels. I have have a lamination machine, but you can get yours laminated at any copy store.


Depending on the size of your bins and the kinds of bins you use, these labels will need to be printed differently. If you're using typical plastic bins, you can just size your labels to fit, print, cut and laminate them before taping them to your bins. If you have canvas bins like mine, you will want to leave extra space at the top of each label. Once you print them, you will need to cut the labels out leaving that extra room at the top for you to punch a hole into. After you laminate and cut out the final labels, you can punch that same hole again, thread the clamps through them, and hang them on their corresponding bins. Here's how one of my final ones looked.


It was a little time consuming, but I think it will totally be worth it in the long run.  At least the kids can't claim they don't know where things go anymore, which I hope will reduce the amount of junk they leave strewn all over the house. Best of all, their playroom looks super cute!


If you have any questions or ideas to share, please leave me a message in the comments below. I will do my best to address them as quickly as possible.

Friday, August 17, 2012

Lovin' the Weekend Blog Hop

I am a featured host for the blog hop today. Thanks so much to Karen from "Tots and Me" for including me. Now lets hop!

Welcome to the forty-sixth weekend of Lovin' the Weekend Blog Hops.
Giveaway Linky is the bottom linky!
First things first:
Don't forget to check out my co-host's blog:
Adventures of the Mommy Homemaker
In case you didn't know, I have also started randomly choosing a Featured host each week from the Lovin' The Readers linky. This week I would like to introduce you to Courtney from Musings of an im-Perfect Mom. Her blog is quite new, and I'm sure she would love some followers. She has quite a few great informational posts for parents, including DIY, Crafts/Education and other resources. Please take the time to check out her blog. 
Please make sure to stop by and say hi, let them know you are visiting from the Lovin' The Weekend Blog Hops.Don't forget to link up to the Lovin' the Readers Hop if you would like a chance to be a Featured host next week. Please comment with a way to contact you, especially if there is not an obvious way mentioned on your blog. I would love to include a little write up about you and your blog in the next week's Lovin' The Weekend Blog Hop post, including a link to your blog. And you will get to include the linky codes on your blog. Sound fun? I'm looking forward to getting to know my readers better.
Here's how this blog hop works. I would appreciate it if you would follow myself, my co-host and my Featured Host via GFC. If you no longer have GFC please follow in some other way. After that there are three different linkys you can link to. Whichever one you choose to link to, please grab that button and share it on your blog (the codes are on my sidebar). I'd love it if you could tweet or in some other way share about this blog hop, the more people who know about it, the more potential visitors and new followers of your blog. I'd love to meet some new friends this weekend.  
I have noticed that some people are more interested in just increasing their numbers, while others really want people who appreciate their blog and want to keep up with their posts. So, I decided to create two separate linkys. The third linky is for you to link up your giveaways.
If you are interested in increasing the number of followers to your blog via GFC, Linky Followers, email, Twitter, Facebook or Google+ link up here. I will follow you back if you follow me (just note which one you are linking to):
Tots and Me
If you are interested in gaining followers to your blog who will read and comment and truly find an interest in your blog, link up here:
Tots and Me
If you have family friendly giveaways to link up, here's your spot. Please make sure to include an end date for your giveaway.
Tots and Me
I am so glad you stopped by. Please leave a comment if you link up and I will be sure to stop by and follow back.
Don't forget to check out my "Blog Hops" page for other great weekend blog hops!! The Back to Preschool Giveaway Blast is up and running strong. Stop by to enter for your chance to win 1 of 5 prizes geared for young children.  Grand prize is valued at $418 and has an awesome collection of items. And there is a 2nd Place Prize Pack and 3 runner up prizes. Good luck!
  Photobucket

Thursday, August 16, 2012

Deceptive Marketing - Children's Multivitamins


Most of us want to believe the people who produce children's products actually care about our children. They don't. Like everyone else, all they care about is their bottom line.


  • That is why baby bottle companies continued to make bottles using BPA even though evidence indicated it might not be safe.
  • That is why millions of toys produced in China were recalled for containing lead paint.
  • That is why foods containing artificial flavors and dyes, high fructose corn syrup and trans fat are marketed to children
And that is why  NBTY, Inc. (and subsidiary's NatureSmart LLC and Rexall Sundown, Inc.) deceptively labeled their Disney Princesses and Marvel Superhero children's multivitamins, to make us believe they contained the DHA our children need for healthy brain and eye development when they didn't.

In actuality, they contained only a fraction of the DHA necessary to substantiate these claims.

Read the full article here.

It is just another example of corporate America trying to dupe the public into buying their sub-standard crap. And I fell for it. I bought both of these multivitamins for my two children, specifically opting for these over the more natural options because they contained DHA. And now I'm pissed off. Not because my kids didn't get the DHA I thought they were getting, and not because I spent so much money on these crappy vitamins, but because I was duped.

I have always taken pride in my ability to see through corporate propaganda, thoroughly evaluating every product that came into my home and not taking things at face value, but I totally dropped the ball on this one. I didn't check to see if the amount of DHA these vitamins contained was enough to support the effects they were touting. It honestly didn't even occur to me.

And though I know the vitamins weren't made by Disney, it saddens me to see how they would apply their brand to a product without first evaluating it. Not that I would really expect this from any corporation, especially one as big as Disney. Like I said, I'm aware that they don't really care about my children. It's a fact of the world we live in and I realize that, but it still makes me a little sad.

Mostly, it just pisses me off.


Share the love!!

Linkwithin

Related Posts Plugin for WordPress, Blogger...